Scarebird Disc Brake Brackets for a 1966 Mustang!!

This 'how to' was published on fordmuscle.com. Check it out here: http://www.fordmuscle.com/archives/2008/06/BrakeDance/index.php
OK, this is my experience with the Scarebird brackets for converting my 1966 Mustang with stock 5 lug drum brakes to disc brakes. First remember safety. Don’t be an idiot. No need for it. Next a lot of the mustang community is looking for a easy way to convert their cars to a safer way of braking. The Scarebird bracket is a great way of doing it There are kits available out there already to complete this task but they can cost a lot and lets face it most people don’t have a lot of cash to throw around. So on to the swap.
The first thing you have to have is a Mustang with the stock V8 drum brake set up. I have not done this with a 6 cylinder car. Next you need the Scarebird bracket set. You can order them from Scarebird http://www.scarebird.com/. I phoned them first with a few questions and the guy I spoke to was very helpThe set cost me $125 + shipping.. with the brackets you will also get two rings with each bracket. So total you will get a 6 piece kit.
The brackets were not painted. I painted them black to make them look good. There are two sets of rings. One is a spacer for the spindle (small ring) and the other is a spacer for the caliper (large ring).
The list of parts that I purchased is as follows:
-’83 Ford Ranger Rotors (2WD)
-’83 Chevy S10 Calipers (2WD)
-’83 Chevy S10 Brake Pads (2WD)
-’66 Mustang Inner bearings (pair) *not pictured
-’66 Mustang Outer bearings (pair) *not pictured
-’79 Caprice Brake hose (pair)
-’83 Ford Ranger Bearing Seal (pair) *not pictured
-pair of Banjo Bolts
-pair Cotter Pins *not pictured
In each case I asked for the v6 parts at the parts counter. The bolt pattern on the rotor is 5x4.5 as required.
OK. First remember SAFETY. No need for anyone to get hurt. So once you have the car jacked up and the tire removed you will need to remove the drum exposing the backing plate, shoes, etc. To do this get the dust cap off. Remove the cotter pin, nut lock, and the spindle nut. Put them to the side. You will need the nut and the nut lock. I replaced the cotter pin. I used a hammer to knock the drum off.
Now undo the 4 bolts that hold the backing plate to the spindle. The nut is 9/16. I also cut the brake hose with side cutters since I was replacing them. Keep the 4 nuts & bolts to use on the install of the other parts or you can choose to replace them. It’s up to you. I decided to reuse them
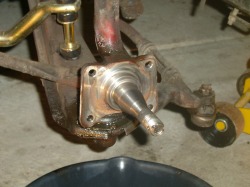
When the backing plate is removed give the spindle a good cleaning.
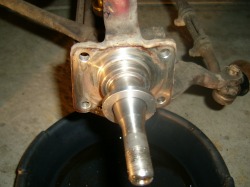
Now you get to use the first of the two rings. The small ring is a spacer that helps everything line up nice. On the inside of the ring is an angled edge. This goes on the spindle towards the spindle. If you put it on right it will butt up against the spindle nice and tight. If not you will have a space. Space is BAD!
I put a little grease on there just to help it slide on nice.
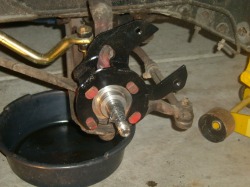
OK. Now you get to put on the bracket. You will line it up with the caliper bolts toward the rear of the car. Bolt it up using the four bolts that you have from removing the drums. I cleaned mine up first. Bolts up nice and looks almost stock. Grease up the spindle.
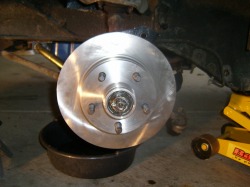
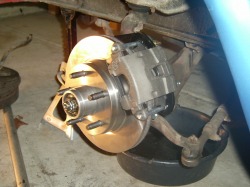
Time for the rotor. I bought new inner and outer bearing so I had to pack them with fresh grease. Nice job. : - ( Anyway, put the large inner bearing in the back of the rotor and install your new bearing seal. Make sure you don’t bend it and that it is a tight seal. Lube the edge of the seal with just a touch of grease from your finger so it will slide on the spindle nicely. Then put the rotor on with some attention so that it fits flush. Then put on the smaller outer bearing, out bearing washer, and then nut. Tighten and back off ¼ turn. Check to make sure the rotor can rotate and is not too tight but no so loose that there is play. Add the nut lock, cotter pin, and dust cap.
Alright get the caliper out and the second larger ring that you got from Scarebird. Put some brake quiet lube on the inside lip of the ring. Then put the ring on the piston of the caliper. It can only go on one way so you really can’t mess it up. If you do it right it should stay on.
Then get your pads out and add brake quiet lube and install them on the caliper as required.
NOTE: When I first put these on the car I did not notice that I had the calipers on upside down and on the wrong sides of the car. What I mean is the mounting hole for the brake lines need to be on the top and I mounted them with the hole to the ground. So MOUNT WITH HOSE MOUNT GOING UP
This is the moment you have been waiting for. Clean the rotor with brake cleaner and slide the caliper on. It should line up just perfect. I was very surprised at how well everything fit together.
As a extra note, I measured the OFFSET from the spindle arm to the edge of the drum and the spindle and the edge of the rotor and it is the same at 3.75” so this should not change the way your wheels will fit. Also, to add to this I do not have stock rims. Stock rims may have problems as noted by Scarebird. When the caliper is on.
Add the bolts and tighten to spec. Again, clean everything with brake cleaner
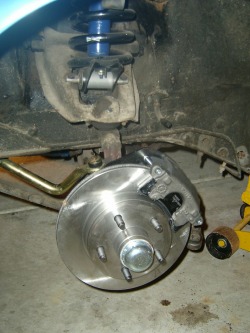
Fits like it was made to go on there. Looks real good as well. Time for a test fit with your wheels. If you are like me and had/have several doubts about this Scarebird disc swap you will be very happy when your wheels will bolt up and your car has much better stopping power. SWEET! I think many people who look at the Scarebird site will have many questions and doubts because of the lack of detail. I hope that this helps. If I can do it anyone can.
SCAREBIRD Brackets = $125.00
NPD
Front Drum Steal Lines= $ 29.95
Advanced Auto
'74 Maverk Disc/Drum Master Brake cylinder = $ 27.48
2 dust caps = $ 6.72
Brake Hose = $ 11.55
Brake Hose = $ 11.55
Brake Pads = $ 28.38
Banjo Bolt = $ 3.42
Banjo Bolt = $ 3.42
Rotor = $ 23.11
Rotor = $ 23.11
Brake Caliper = $ 11.55
Brake Caliper = $ 11.55
*Assorted Pressure fittings and Brake line = $ 25.00
I picked these up as I needed them. I did front lines first then rear lines.
Autozone
Inner Bearing = $ 5.69
Inner Bearing = $ 5.69
Outer Bearing = $ 9.99
Outer Bearing = $ 9.99
cotter pins = $ 1.99
Summit
Brake Prop Valve = $ 35.00
Wal-Mart
Brake Fluid = $ 3.77
Summit
Brake Proportioning Valve = $34.95
TOTAL $ 448.86 + tax & shipping
If my math is right. You can beat that.
