Dual Master Cylinder

Disc Brakes Part II
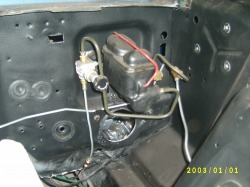
Now I decided it was time to remove the master cylinder. This is pretty easy. I took a doper that sucked up the brake fluid that was in the mc to empty it so I would keep the mess to a min. Put a rag below it and then went under the dash. On the brake pedal there is the switch that you will need to remove. That will also allow you to remove the push rod. Undo the cotter pin, pull off the switch, and push the rod to the side. Make sure you bench bleed the new MC. It is easy to do. Follow the step by step in the box. Then undo two bolts and pull off the old MC and bolt on the new MC.
Now with the new MC in place I had an extra project to do and figured this was the right time. My car was originally a 3 sp. So it still has the clutch pedal tucked up under the carpet. Out came the old pedals (clutch and brake) and in went the new. I cleaned the brake switch up nice on the contact points so I get a good connection. Put on the push rod and then the switch.
So with the extra hard ware I figure I could add say $20 to the cost. I did not keep track of this cost.
The major problem that I have had with this whole swap was the brake pedal.. Now for someone doing this swap they will most likely not have this problem. Also most will not have to replace steel lines unless they round the nuts on the hoses to the lines... Almost no one will replace the brake pedal... I did because my car was originally a 3 sp and it still has the standard pedal set up. So I have gotten a auto gas pedal with a kick down and a auto brake pedal. This is the time to put in the auto brake pedal. This was a problem due to having to get the spring on the clutch pedal off. Solution, I cut it with the drumal. Easy. Now I have the auto brake pedal on and it is looking good.
So now it is time to plumb the lines to the MC. If you remember I got a three way distribution block for the front lines. Both the stock replacement lines bolted right up to it. Not bending of the new steal lines was needed. That left one opening on the block to plumb to the MC. This was fairly easy. I bought a 8” of 3/16 steal brake line. This is pre cut and flared with the pressure fittings already installed. I then measured a piece of wire coat hanger and cut it to the same length as the steal line. Then I carefully bent the wire to the shape that I needed the line to fit. I bent it so the line would mate up the MC and the distribution block. This worked out great. Put it in place and tightened it up. Be sure to use two wrenches. One to tighten the fitting and one to hold the dist. block so you don’t bend/kink the line
Note: I have heard people say that you had to have a loop in your line like there is on the original MC. This is not the case. That loop made flexing the line easy for the guys on the assembly line due to nothing really being exactly the same. I compared the original line and the repo one and they are very different. No loop is required. Additionally, the tubing is pretty easy to bend and is more forgiving than what I thought it would be.
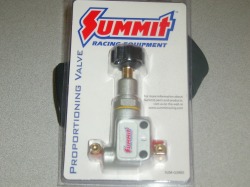
With the front line in place I needed to find a place to mount my proportioning valve. I decided that by using a wood framing bracket I could mount the valve to a bolt on the fire wall. This keeps the valve out of the way and also keeps it close to the MC and lines for installation and braking adjustment. In this situation I did what worked.
I flared the old line where it was cut. Using a connecting pressure fitting that allowed a male to male connection I installed it on the line to the rear of the car. I made sure it was tight.
Now with the wire to use as a template I bent the 16” piece of brake line and first installing the pressure fitting into the prop valve. Making sure it is not crossed and tight. Then I was able to screw in the bottom fitting into the male-to-male connector under the car.
Checked to make sure all fittings were tight. Bleed the system. What is nice about this is I did bleed the system after I tired the short cut. Because of that I only have to re-bleed the rear lines. Again, after the bleed check to make sure the fittings are not leaking. I used a piece of paper towel to do this. No wet spots are good.
Now with everything in place and the system feeling tight it is time to adjust the rear brakes. I have a home in a newer area. There are a couple of roads with no one around. I started by going about 35 and slamming on the brakes. Checking to make sure that that rears do not lock up before the fronts. You want them to lock up about the same time. This did not take long to do. I used the adjustment knob on the prop valve. Set it to ‘OPEN’ or ‘MAX BRAKES’. Did a full turn of the knob at a time at first and then a half turn after to fine tune it.
WOW! Is all I can say. The brakes feel GREAT! Almost like having power brakes. There is no pulling and the response is quick. If you don’t have big money for the racing brakes this is a great way to go. I am very impressed with this swap and I believe that anyone with some mechanical knowledge can do it.
 |
 |
